.png?width=250&height=54&name=ORIS%20logo%20Horizontal%20Colours%20(1).png)
2D Hatching Option
By clicking on "2D Hatching Option" (command button D), you access the environment for managing 2D project types.
The image below displays a table listing the available Layer Names, referred to as Pavement Design Options (field D16), accompanied by their respective surface areas measured in the county-defined units, which are in this case square meters (m²)
Figure 5: 2D Hatching, module overview
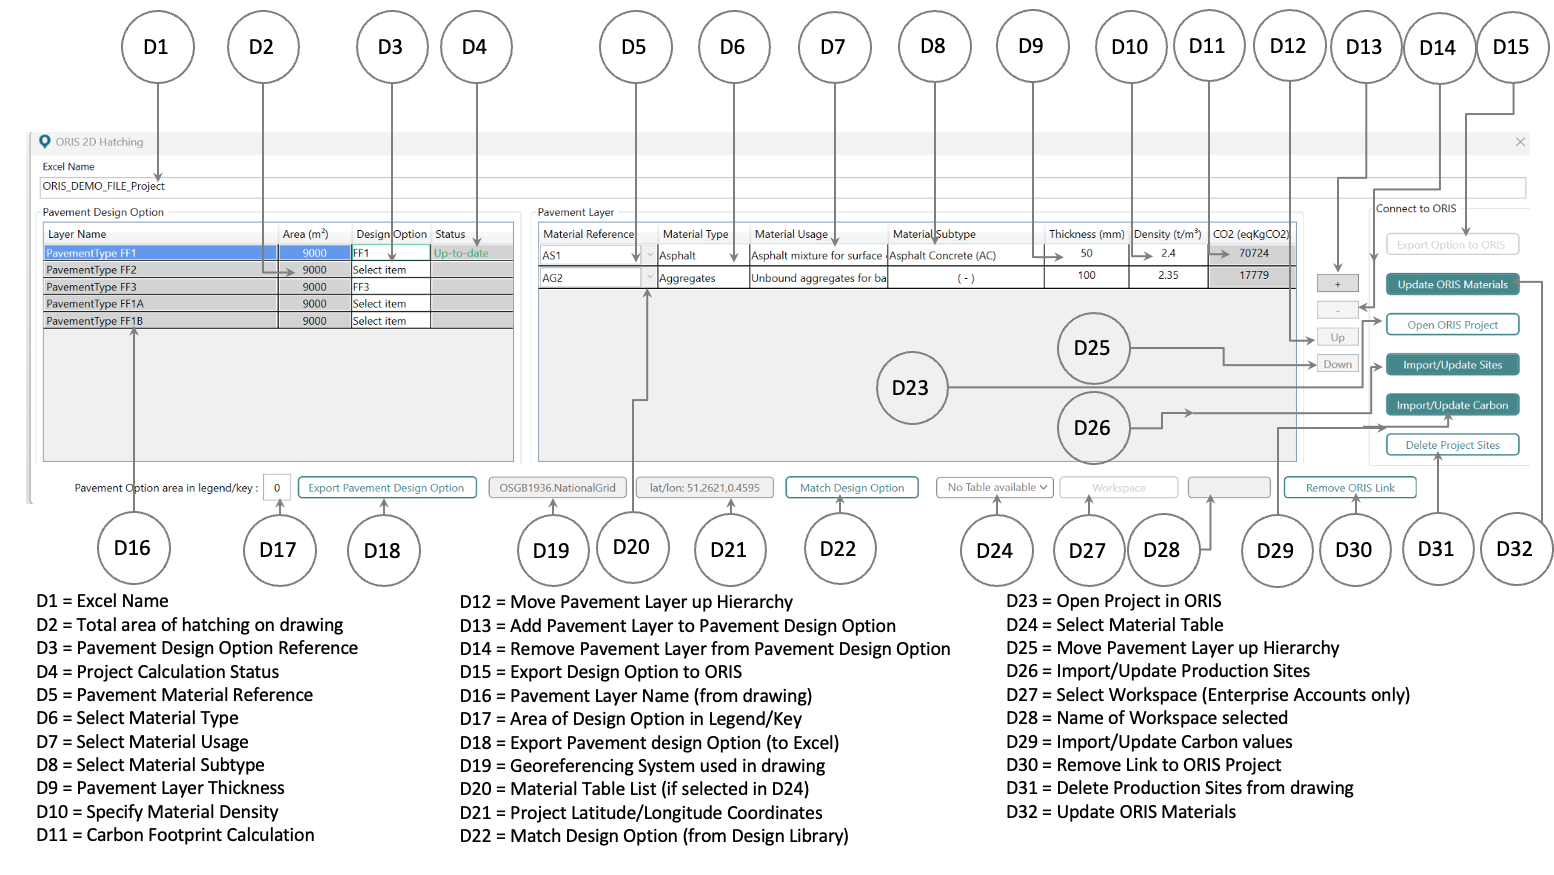
A Pavement Design Option (field D3) consists of the Global surface area of all hatches present in the same Autocad layer. The name of the option is the same as the layer name specified on the drawing.
If Pavement Design Options have been defined (see this chapter), it is possible to directly apply the chosen design option to the layer name by selecting Match design Option (command button D22).
Plugin Functionality:
The plugin includes a feature to verify whether a design option name exactly matches the name entered in the last position of the option name. Here's an example to illustrate this:
Matched Examples:
-
- "PavementType FF1"
- "PavementTypeFF1"
In the above cases, the plugin would recognize the design option named "FF1" as a match. However, variations such as "PavementTypeFF1A" or "PavementType FF1 road" would not be considered as matches.
Note: When a design model is associated with an option, any changes made in the design model will be automatically reflected in the option upon reloading.
To prevent this automatic updating:
- Apply a model.
- Select "No Design" to unlink the option from the associated model. This will prevent further automatic updates from the design model.
View the List of Pavement Materials in the Pavement Design Option
In the image above, you can view all of the materials present in the selected Pavement Design Option. To select a material, click on it from the drop-down list (47). You then have the option to modify the Material Reference (field D5), select the Material Type (drop-down list D6), Material Usage (drop-down list D7), material subtype (drop-down list D8), specify the Thickness (field D9) and adjust the density from the default value (field D10).
Note: The carbon footprint of the material layer (field D11) is only displayed in this table once calculated on the ORIS platform.
2D Hatching Requirements
Methodology
- The plugin retrieves all hatchings (areas) present in the same Civil 3D layer whose name has more than 5 letters (so not to take layer 0 or any other modeling layer).
- Then the plugin adds up the value of each hatched area to obtain a global hatched area for the layer. This corresponds to a pavement design option.
- Finally, the user can define or apply a pavement model to create the various layers of material for this option.
Modeling
Here is a typical example of correct 2D modeling required for the plugin to function correctly.
Define a new layer with the name of the desired pavement option, e.g. "PavementType FF1".
Draw closed polylines corresponding to the road boundaries.
Add hatching within these closed polylines inside the "PavementType FF1" layer.
If you have set up 2D modeling as above, when you launch the "2D Hatching Option", hatch retrieval will be carried out correctly.
Remarks
If the hatch has not been modeled correctly or, for example, if its boundaries have been removed and the value of its area is not available, the plugin will computationally redefine the value of its area.
Note: This approach may yield slightly less precise results compared to cases where the hatch is accurately modeled.
Note 2: The data is stored using the layer name as a reference point. Therefore, if the layer name is modified, the associated data will be lost