.png?width=250&height=54&name=ORIS%20logo%20Horizontal%20Colours%20(1).png)
|
This guide walks you through everything you need to run your first carbon assessment in ORIS without a BIM model, spreadsheet or PDF, so that you can build the bill of quantities manually from any quantity source. It covers setting up a workspace, creating an assessment, entering materials and quantities, completing transport, and comparing design options. Each section links to the dedicated article for that topic if you need more detail. Understanding the manual input approach is the foundation for everything else. |
Step 1: Create a New Assessment
Step 2: Select the Material Library and Transport Method
Step 3: Build the Bill of Quantities
Step 4: Set Transport and Add Construction Operations
Step 5: Review Results and Identify Hotspots
Step 6: Track Assessment Changes with Versioning
Step 7: Compare Design Options
Before You Start
ORIS organises all work inside a three-level hierarchy: Organisation, Workspace, and assets within a workspace. The Workspace is the key level for day-to-day project work: it holds your Material Assessments, Private Production Sites, and Project Portfolios, and controls who on the team can access them.
CHECK YOUR ORGANISATION
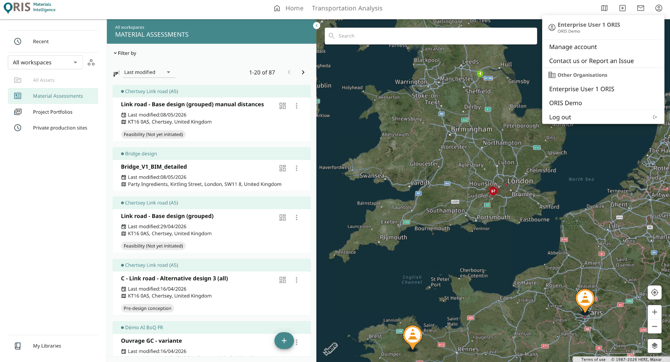
Before creating an assessment, confirm you are working in the company Organisation. When you first log in, your account may be associated with both a personal organisation and your company organisation. Always select the company organisation, as assets created here can be shared with colleagues; those in a personal organisation can not.
To check from which organisation you are working:
- Click your profile icon (top-right corner) to open the account menu,
- You can see your current organisation under your account name
- Other organisations you are part of are visible under the Other Organisations section
CREATE OR ACCESS A WORKSPACE
A workspace is the container for your project. All Material Assessments, Private Production Sites, and Project Portfolios that belong to the same project should live in the same workspace. Both the Comparison Dashboard and Project Portfolio features draw only from the active workspace, so splitting a project across multiple workspaces will prevent these features from working as intended.
Go to the homepage and use the workspace selector in the left sidebar to choose the workspace you want to work in. Next to it, the three-dots icon provides access to the full list of workspaces you belong to, where you can also create a new one. Alternatively, you can use the New workspace button in the central homepage panel to access the same workspace list and creation options. From there you can see the full list of assets on each workspace, and you can also manage user access.
Step 1: Create a New Assessment
To access existing assets or create new ones, go to the homepage and use the workspace selector in the left sidebar to choose the relevant workspace. Then select Material Assessment from the list below to view existing assessments. You can also create a new one by clicking on the + button in the bottom-right corner. From the options that appear, select Material Sourcing and Construction Assessment (A1 - A5).
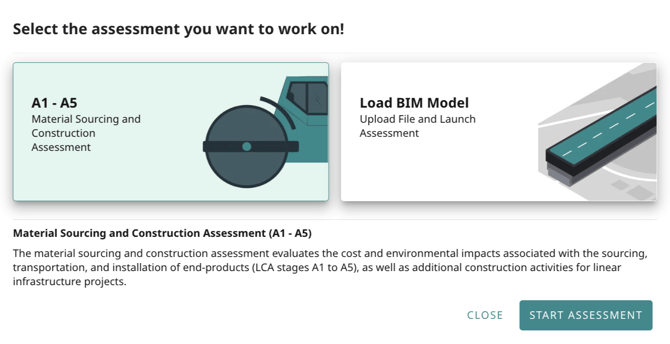
Options to launch a new Material Assessment: Material Sourcing and Construction Assessment (manual data approach), and Load BIM Model (BIM-based workflow).
When a new Material Assessment is created, users need to provide an assessment name and a location. Use a name that identifies both the project and the scope of this specific assessment, for example "Bridge Package - Base Design". The location sets the default search area for suppliers if you later switch to supplier-based transport. The optional description field is the best place to record important project context or the source of your quantities.
Use a consistent naming convention from the start
If you plan to create alternative assessments for comparison, a clear naming pattern such as "Package A - Base Design" and "Package A - Option 2 GGBS" saves time later. Once alternatives accumulate, clear names are the only reliable way to navigate the workspace.
Step 2: Select the Material Library and Transport Method
After providing project details, users are prompted to define a Bill of Quantities. Before building it, two decisions must be made that apply to the entire assessment and cannot be changed per material: the material library and the transport method.
MATERIAL LIBRARY
Select the carbon database that matches the geographical or regulatory context of your project. ORIS offers both global and country-specific libraries, each containing emission factors for construction materials. A single library applies to the whole assessment, which keeps results consistent and comparable across users and assessments.
Tip
If a material you need is not available in the assigned library, two options are available: select the Custom Material entry and define the emission factor manually, keeping the assumption transparent and auditable.
TRANSPORT METHOD
Two methods are available. The choice affects what happens after Step 2:
|
Manual Distance
|
Supplier-Based
|
Which method to choose
If your project is at an early design stage or you need a quick estimate, start with Manual Distance. You can always duplicate the assessment later and switch to Supplier-Based once the design is more advanced.
Step 3: Build the Bill of Quantities
The Bill of Quantities is the core of your assessment. Materials are organised within a hierarchy of groups and sub-groups that you define to reflect your project structure. There is no fixed limit on the number of groups, sub-groups, or hierarchy levels. All carbon and cost data originates at material level; groups are structural only.
DEFINE THE HIERARCHY
Add a group for each major work package or element type in your project: for example, Pavement, Drainage, and Earthworks for a civil project. Within each group, add sub-groups to reflect the next level of breakdown. Sub-group and group names appear in the Results Dashboard charts and in the Comparison Dashboard, so names should be descriptive and consistent.
ADD MATERIAL LINES
Within each group or sub-group, add a material line for each element in your quantities. For each line:
- Select the material from the library. The library provides the emission factor and a default unit and conversion factor for the material.
- Enter the quantity from your source data. ORIS supports tonnes, cubic metres, square metres, linear metres, and pieces.
- Verify the unit. ORIS pre-selects a default quantity unit based on the selected material or element. If you change the unit and it matches the emission factor unit, the conversion factor is set to 1 automatically. If the units differ, ORIS requires a conversion factor before the assessment can proceed.
- Set the material classification. Each material is pre-classified as Material In, Material Out, or In Situ. Material In covers materials sourced and delivered to site (the most common case). Material Out covers materials extracted or removed, such as excavated soil. In Situ covers materials already on site that require only on-site processing, such as reclaimed asphalt used for in-situ recycling: no inbound transport is calculated for In Situ materials.
- Add a unit cost (optional). A cost per unit can be entered for each material line. Leaving it blank has no effect on carbon results.
Where material specifications are not yet confirmed
Use materials that conservatively overestimate embodied carbon. Omitting uncertain materials understates the result. Values can be updated once procurement decisions are made.
Step 4: Set Transport and Add Construction Operations
MANUAL DISTANCE TRANSPORT
If you select Manual Distance, a Transportation section appears on each material line. Click it to review the default values for mode, transport type, and distance. Adjust as needed to reflect your best estimate of the supply chain for each material. Click Add Transport to define additional legs for multimodal supply chains.
SUPPLIER-BASED TRANSPORT
If you selected Supplier-Based, Step 3 opens the Site Selection page once you complete Step 2. For each material, set the search radius, site type filter, and truck parameters, then run the search. ORIS returns a list of candidate suppliers with transport carbon, cost, one-way distance and time, and estimated roundtrips per day. Confirm at least one supplier per material using the checkbox or by clicking the site on the map.
Selecting more than one supplier for a material shows a range of results in the dashboard. If no site is found within the radius, widen it or switch that material to Manual Distance with a conservative estimate.
Truck load for non-tonne units
If a material unit is m3, m2, linear metres or pieces rather than tonnes, ORIS does not provide a default truck load. Enter the truck load manually in the material unit to enable running the calculation of transport emissions.
CONSTRUCTION OPERATIONS
Construction operations are added at material level and account for the carbon footprint and cost of material handling, placement, and installation on site. They are optional but useful for a complete picture of the construction stage.
To add an operation, click the construction button on a material line and select from the library. ORIS provides a default library focused on road and pavement engineering, with equipment-based entries that include default productivity and fuel consumption values. All the values can be adjusted to reflect project-specific conditions, for example:
- Equipment name: Editable to match the specific plant being used.
- Productivity: Adjust to reflect actual on-site rates for the project.
- Energy type and consumption: Modify to match measured or specified values.
Custom operation libraries can be created at organisation level and reused across assessments, providing consistency and saving setup time on future projects. Two things to keep in mind when working with construction operations:
- Where the material unit in the BoQ differs from the operation's productivity unit, the material quantity for that operation line must be entered.
- Cost values within construction operations are optional. Leaving them blank has no effect on carbon results.
Step 5: Review Results and Identify Hotspots
Once all required steps are complete, ORIS generates the Results Dashboard showing total embodied carbon and cost, broken down by the group and sub-group hierarchy you defined in the mapping. Charts for the product and construction stage are interactive: select any group or sub-group to drill into the breakdown at the next level of detail, down to individual materials.
Before moving to scenario comparison, use the Results Dashboard to identify carbon hotspots. Look at which project life cycle stages, groups and materials account for the largest share of total carbon. In pavement projects, bituminous materials typically dominate. In structures, concrete and steel tend to drive results. In earthworks, transport distances are often the critical variable.
Focus optimisation effort where it delivers the most
A 10% carbon reduction on a material that accounts for 60% of total project carbon delivers six times more savings than the same reduction on a material at 10%. Rank your hotspots before deciding where to focus scenario analysis.
Step 6: Track Assessment Changes with Versioning
As your assessment evolves, quantities get refined, material selections change, transport assumptions are updated, and construction operations are adjusted. Versioning in ORIS lets you track these changes without losing earlier iterations.
Versions in a Material Assessment are created in two ways.
- Manually, at any point, by clicking the version indicator in the top right corner and saving a new version (use this to mark a milestone such as a design freeze or a change in material specification).
- Automatically, whenever you run calculations: each run creates a subversion numbered as a decimal increment of the parent version.
To view and manage versions, click the version indicator to open the version panel. From here you can see all versions, who created each one, when it was last modified, and its description. Depending on your role, you may also be able to restore a previous version if a design direction changes.
Step 7: Compare Design Options
To compare design or material options, create additional Material Assessments in the same workspace. The most efficient way to do this is to duplicate the base assessment: the duplicate carries over the full bill of quantities structure, all material selections, quantities, units, conversion factors, transport settings, and construction operations.
Rename the duplicate to reflect what has changed, then update only the elements that differ. Two types of alternative are common:
- Alternative material specification. The quantities stay the same; only the material changes. Find the material row, search for the alternative in the library, and select it. Verify that the conversion factor and transport assumptions still apply.
- Alternative design or scope. The quantities change. Update the relevant lines in the duplicate to reflect the revised design, keeping the same material selections so the comparison isolates the design change.
Once you have two or more assessments in the same workspace, access the Comparison Dashboard from within any results dashboard. The assessment you open it from becomes the reference: all others are compared against it. Three views are available: Overview, Breakdown by material type, group or LCA stage, and Differences, which shows the carbon and cost delta broken down to the level that explains where savings come from.