.png?width=250&height=54&name=ORIS%20logo%20Horizontal%20Colours%20(1).png)
This guide walks you through everything you need to run your first carbon assessment in ORIS starting from a BIM or CAD model. It covers setting up a workspace, uploading and checking your model, mapping quantities to the carbon database, completing the assessment, and comparing design options.
Step 2: Upload and Check the Model
Step 3: Map Quantities and Build Your Configuration
Step 4: Create the Assessment and Complete Transport and Operations
Step 5: Review Results and Identify Hotspots
Step 6: Compare Design Options
Step 7: Track Assessment Changes with Versioning
Before You Start
ORIS organises all work inside a three-level hierarchy: Organisation, Workspace, and assets within a workspace. The Workspace is the key level for day-to-day project work: it holds your Material Assessments, Private Production Sites, and Project Portfolios, and controls who on the team can access them.
Before uploading anything, confirm two things:
- You are working in the company Organisation. When you first log in, your account may be associated with both a personal organisation and your company organisation. Always select the company organisation, as assets created here are visible to colleagues; those in a personal organisation are not. To check which organisation you are working in, click your profile icon (top-right corner) to open the account menu, where you can see your current organisation and other organisations you are part of.
- Your model is ready. The open BIM Module reads quantities directly from your model property sets. It does not calculate takeoffs. For the mapping to work, your model must contain: at least one property to group elements (a material name, code, or layer), at least one measurable quantity per element type (volume, area, length, or weight), and ideally a material property to improve AI mapping quality.
Check property set coverage before uploading
The most common cause of incomplete results is a model with missing or inconsistent property data. A few minutes spent checking this saves time later.
Step 1: Set Up a Workspace
A workspace is the container for your project. All Material Assessments, Private Production Sites, and Project Portfolios that belong to the same project should live in the same workspace. Both the Comparison Dashboard and Project Portfolio features draw only from the active workspace, so splitting a project across multiple workspaces will prevent these features from working as intended.
Go to the homepage and use the workspace selector in the left sidebar to choose the workspace you want to work in. Next to it, the three-dots icon provides access to the full list of workspaces you belong to, where you can also create a new one. Alternatively, you can use the New workspace button in the central homepage panel to access the same workspace list and creation options. From there you can see the full list of assets on each workspace, and you can also manage user access.
Assign your BIM model to this workspace before mapping
A model without a workspace assignment cannot have its configuration saved, which means you will need to remap it every time you open it. Once you upload your BIM model on the next steps, assign the model to the correct workspace as the first step.
Step 2: Upload and Check the Model
The open BIM Module is compatible with IFC, Revit, DWG, and NWF files, including 3D models from Civil 3D, Revit, and other authoring tools, as well as 2D CAD drawings.
To access the open BIM Module, go to the homepage and use the workspace selector in the left sidebar to choose the relevant workspace. Then select Material Assessment from the list below to view existing assessments. You can also create a new one by clicking on the + button in the bottom-right corner. From the options that appear, select Load BIM Model. You can also create a new Material Assessment directly from the central panel of the homepage, without having to navigate elsewhere first.
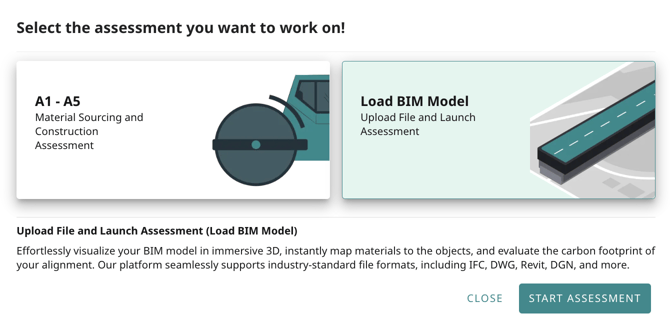
Options to launch a new Material Assessment: Material Sourcing and Construction Assessment (manual data approach), and Load BIM Model (BIM-based workflow).
In the open BIM Module, make sure you have selected the right workspace, then click Upload, drag your file into the window, and wait for the progress bar to complete. You can continue working while the model processes in the background.
INSPECT THE MODEL BEFORE MAPPING
Use the viewer to confirm the model contains the data ORIS needs. Right-click any element and select Show Properties to check the model holds three characteristics:
- A property to categorise the element (code name, material name, or layer).
- A quantity property with a value and unit (volume, area, length, or weight).
- A material property, if available. This improves the quality of AI mapping suggestions.
For a broader check, use the Data Grid to scan property set coverage across all elements at once. The Model Browser shows the parent-child structure of the model, which is useful on complex 3D files.
Step 3: Map Quantities and Build Your Configuration
Go to the Map Quantities tab. This is where you define how model data translates into a carbon assessment. The mapping is captured in a configuration, which you create, save, and reuse. Work through the three tabs in order: Quantity Table, Material Table, and Template Table.
CREATE A CONFIGURATION AND SELECT THE DATABASE
Click Edit Configuration and select Create New. Give it a descriptive name. Choose the carbon database that matches the geographical or regulatory context of your project. The database is set once and applies to all materials in the assessment.
QUANTITY TABLE: DEFINE GROUPING AND EXTRACT QUANTITIES
Click Add Level and select the property to use as your first grouping level. ORIS lists all distinct values of that property as separate rows. Add a second level for a finer breakdown. These two levels become the groups and sub-groups in the Material Assessment. For eachrow, select the quantity property to extract. A green circle confirms the property is populated across all elements in that group.
MATERIAL TABLE: ASSIGN MATERIALS FROM THE DATABASE
Go to the Material Table tab and create an entry for each material you need. Set the unit to match what the model extracts. If the unit differs from the emission factor unit in the database, ORIS requires a conversion factor (typically material density in t/m3 for volumetric quantities). Verify the pre-filled conversion factor matches your material specification and update it if needed. You can also use ORIS AI AI Mapping to accelerate the process.
AI MAPPING
If your model contains material property data, use AI Mapping as a first-pass accelerator. The AI reads property data, searches the selected database, and proposes a material and a quantity unit for each row in the quantity tab. Review each suggestion and adjust as needed. AI Mapping does not propose templates: rows that require multi-material assemblies must be configured manually.
TEMPLATE TABLE: CAPTURE ASSEMBLIES AND NON-MODELLED ELEMENTS
BIM and CAD models rarely contain every physical element needed for a complete carbon assessment. If a modelled element represents an assembly of multiple materials (such as a pavement cross-section or a reinforced concrete element), or if non-modelled components are always associated with a geometry (such as drainage pipes alongside a road alignment), use a template instead of assigning a single material directly.
A template is a reusable composition of multiple materials assigned to a single extracted quantity. It is defined by a base unit (the quantity unit that the model extracts for the elements the template is applied to), and a list of materials, each with a material ratio per unit of that base quantity. The material ratio is what converts the extracted model quantity into an actual material quantity. For example, a pavement template with a base unit of m² might include a surface course, binder course, base course, and sub-base, each with its layer thickness in metres as the ratio (m³/m²). When applied to the extracted quantity of a modeled element (total m² of pavement), ORIS multiplies that quantity by the material ratio of each material in the template to produce the total quantity per material.
Step 4: Create the Assessment and Complete Transport and Operations
When mapping is complete, click Create Project. Set the assessment name, location, workspace, currency, and project step. ORIS generates the Material Assessment and populates the bill of quantities with all groups, sub-groups, material rows, quantities, units, and conversion factors from your configuration.
TRANSPORT
You are redirected to the assessment to complete transport settings. Two methods are available:
|
Manual Distance
|
Supplier-Based
|
OPERATIONS
Once transport is set, optionally add construction operations at material level to account for the carbon footprint of material handling and installation. These are optional but useful for a complete picture of the construction stage.
To add an operation, click the construction button on a material line and select from the library. ORIS provides a default library focused on road and pavement engineering, with equipment-based entries that include default productivity and fuel consumption values. All the values can be adjusted to reflect project-specific conditions, for example:
- Equipment name: Editable to match the specific plant being used.
- Productivity: Adjust to reflect actual on-site rates for the project.
- Energy type and consumption: Modify to match measured or specified values.
Custom operation libraries can be created at organisation level and reused across assessments, providing consistency and saving setup time on future projects. Two things to keep in mind when working with construction operations:
- Where the material unit in the BoQ differs from the operation's productivity unit, the material quantity for that operation line must be entered manually.
- Cost values within construction operations are optional. Leaving them blank has no effect on carbon results.
Step 5: Review Results and Identify Hotspots
Once all required steps are complete, ORIS generates the Results Dashboard showing total embodied carbon and cost, broken down by the group and sub-group hierarchy you defined in the mapping. Charts for the product and construction stage are interactive: select any group or sub-group to drill into the breakdown at the next level of detail, down to individual materials.
Before moving to scenario comparison, use the Results Dashboard to identify carbon hotspots. Look at which project life cycle stages, groups and materials account for the largest share of total carbon. In pavement projects, bituminous materials typically dominate. In structures, concrete and steel tend to drive results. In earthworks, transport distances are often the critical variable.
If you are working with a 3D model, use the carbon heatmap in the open BIM Module. It colour-codes every element according to its A1-A3 carbon contribution, giving you an immediate spatial view of where the highest impacts are.
Focus optimisation effort where it delivers the most
A 10% carbon reduction on a material that accounts for 60% of total project carbon delivers six times more savings than the same reduction on a material at 10%. Rank your hotspots before deciding where to focus scenario analysis.
Step 6: Compare Design Options
To compare design or material options, create additional Material Assessments in the same workspace. The most efficient way to do this is to duplicate the base assessment: the duplicate carries over the full bill of quantities structure, all material selections, quantities, units, conversion factors, transport settings, and construction operations.
Rename the duplicate to reflect what has changed, then update only the elements that differ. Two types of alternative are common:
- Alternative material specification. The quantities stay the same; only the material changes. Find the material row, search for the alternative in the database, and select it. Verify the conversion factor and transport assumptions still apply.
- Alternative design or geometry. The bill of quantities changes. Update the quantities in the duplicate to reflect the revised design, keeping the same material selections so the comparison isolates the design change. If you have an alternative design, upload it on the BIM Module and follow the same steps as above.
Once you have two or more assessments in the same workspace, access the Comparison Dashboard from within any results dashboard. The assessment you open it from becomes the reference: all others are compared against it. Three views are available: Overview, Breakdown by material type, group or LCA stage, and Differences, which shows the carbon and cost delta broken down to the level that explains where savings come from.
Name assessments clearly before creating alternatives
Use descriptive names from the start, for example "Base Design", "Option 1 - RAP 40%", "Option 2 - GGBS Concrete". Once alternatives accumulate, clear names are the only reliable way to navigate the workspace and communicate results.
Step 7: Track Assessment Changes with Versioning
BIM-based assessments evolve alongside the model, and versioning in ORIS operates at two levels:
- Uploading an updated model: If your model evolves during the project, you can upload revised files as new versions of the same model entry, as long as they share the same filename. ORIS can store each upload as a separate version, and a saved configuration from the previous version can be applied to the new version, avoiding the need to create a new configuration from scratch.
- Updating Project Calculations: When you launch calculations from an existing configuration on a new model version, ORIS does not create a new Material Assessment. Instead, it adds a new version to the existing one, keeping all design iterations consolidated in one place. The same applies when you update a configuration within an existing model version.